Smugglers' Gold
![]() Smugglers' Gold is was written by club member Shaun Whitehead and published in December 2000 via the club (but open to all). About 500 copies of the eight-page hunt with monochrome illustrations were made available for £10.
Smugglers' Gold is was written by club member Shaun Whitehead and published in December 2000 via the club (but open to all). About 500 copies of the eight-page hunt with monochrome illustrations were made available for £10.
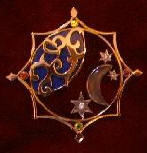
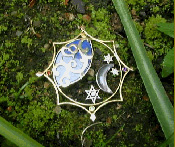 No-one who has seen the valuable prize has failed to admire its beauty. It was fashioned by Michael Grundy, Goldsmith and Designer of Leicester, England. It is made from red, yellow, white and green gold, and holds precious and semi-precious stones, including a diamond-set star. The jewel represents the earth, moon stars set in a glorious golden universe.
Originally designed for a project called Enigmoid, the jewel is valued at £3000 and was buried in a space-age capsule.
After nearly 2 and a half years of the puzzle remaining unsolved, the author released a new hint for this hunt at 9:00am on 31 March 2003. See the official page for details.
 |
 |
|
|
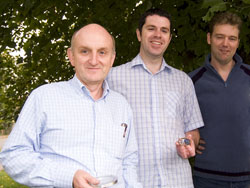
Brian Souter and Paul Harkin with Puzzle-master Shaun Whitehead photo by Nick Perry |
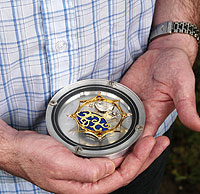
Paul holds the valuable jewel in the space-age capsule that kept it in mint condition, under ground, for thee and a half years. |
Eventually, three and a half years after the hunt was originally published, club member Paul Harkin claimed the prize near Robin Hood's Bay in Whitby, North Yorkshire at around 9:30 am on Sunday 11 July 2004. Paul had been working hard on the hunt for some time and collaboration with club members Matt Edwards and Brian Souter (who accompanied Paul to dig up the treasure) was invaluable.
The official Smugglers' Gold web page is hosted on this site.
Essentially, the solution can be split into 4 stages:
The clues to solving this are in the lines:
it is clear we share a common interest
I already had an idea about a possible starting point from previous research
The common interest refers to treasure hunting in general. The previous research then refers to the treasure hunting books that the author studied as a child, namely Lost Dutchman Mine, LeVasseur Mystery and Cocos Island. The author states, 'Whenever I could, I added these ancient tomes, one by one'. Each of the three book titles contains some Roman Numerals, which can be added together for all three books to give a total of 2706.
In the introduction to the 'Score, one' riddle, it states, 'You will find four that, with the exception of the last, lead to something that I would imagine the smugglers knew little of'. The 'four' refers to the four digits of the 2706. The final 6 must therefore be discarded, as instructed, to give 270.
In the story immediately after the three book titles, it states, 'I was a regular visitor to the local library, and from an early age I knew where to find the sections concerning treasure, codes and puzzles'. This is a clue to library classification systems. One of these, the Dewey Decimal system, is required to solve the clue. The number 270 must be referenced in the Dewey system, to find the corresponding category heading. This can be found to be CHRISTIAN CHURCH HISTORY. This is the key phrase that is needed to solve the 'Score, one' riddle.
It's worth noting at this point that the extra clue which was released in March 2003 was another clue to finding this key phrase. The 'endless total' being the 270, the 'follower' being the Christian, 'where he follows', the church, and 'that which has gone before', history.
Another thing of note here was a small red herring. The categories botany, psychology, law and medicine related to another library classification system, the Bliss Classification. This uses alphabetic rather than numeric classmarks. The letters for the four categories listed spelt out F I S H.
The 'Score, one' riddle was therefore solved as follows:
The riddle contains many words which are representative of certain numbers. These numbers then indicate the letter position within the key phrase. In certain instances, the instruction is to add or subtract - this involves moving the requisite number of places up or down the alphabet from the key phrase letter to achieve the solution letter. The solution is therefore:
Score = 20 = O One = 1 = C Three back from the soccer team = 11 (-3) = H (-3) = E A quintet = 5 = S Score again = 20 = O "Black Jack" = 21 = R Four forward from the octet = 8 (+4) = A (+4) = E The number in the statue at Gisa = SphInX = 6 = T The seas = 7 = I A brace = 2 = H Another brace back from the final one = last letter (-2) = Y (-2) = W
Reading the whole solution phrase in reverse gives:
WHITE ROSE CO
Or in other words, Yorkshire.
The first step in understanding the meaning of the numbers on the scrap of paper is to find the 'key' that is alluded to in the story. There are several clues to help to do this, contained in the lines:
hidden by a bloom of beautiful flowers
a shaft of bright sunlight settled
I have been able to work out a way of hiding it myself
The illustration of the bookshelf also provided a clue to the solution.
The flowers and sunlight were a clue to Ultraviolet light, and the book being taken from the bookshelf lies between the letters T and W, which also hints at UV. The way that the author has hidden the key is by using a UV pen. Therefore, placing a copy of the page under a UV light will reveal the 'key' written on top of the 'symbol', which is -6.
Now the key must be applied to all of the numbers on the scrap of paper, in other words, subtract six from them.
In the preamble to the 'Score, one' riddle, it states that the answer 'forms an invaluable basis for the next step'. Therefore, the answer, WHITE ROSE CO, should be used as the key phrase to solve the numbers puzzle on the scrap of paper. This reveals:
HTWOO(C) SC
X WH TREES
Therefore, the solution to the scrap of paper puzzle gives an area in Yorkshire within which to search.
HTWOO(C) = H2O (sea)
SC = SCARBOROUGH
WH = WHITBY
TREES = DALBY FOREST
A rectangle can be drawn to link these four points. This corresponds to the rectangle which forms part of the 'symbol' on the scrap of paper, at the centre of the four sets of numbers.
The next stage of the solution involves understanding the meaning of the 'X' which is drawn within the rectangle on the scrap of paper.
In the story, on the night the author locates the jewel, he stops for a moment and imagines a scene from the night when the Ran-I-Mur jewel was hidden by the smugglers. This scene is depicted in the illustration at the beginning of the story, where many of the mentioned images can be seen; the ship in the cove, the owl, the smugglers' leader, the casket in his hand, etc. This illustration is also distinct from all the other illustrations in the story, as it is the only one which does not have a framed border - this hints at its importance.
The illustration is rectangular, and is oriented in landscape view. This corresponds to the rectangle on the scrap of paper. The illustration also contains an 'X' symbol, which is drawn on top of the casket in the smugglers' leader's hand. The scrap of paper symbol is therefore indicating that the rectangle relates to the illustration, and that the position of the 'X' in the illustration is important.
The illustration must therefore be overlaid on a map of North Yorkshire, such that the top right hand corner of the illustration falls on Scarborough, the bottom left hand corner on Whitby, top left in the sea, and bottom right in Dalby Forest.
To get an accurate position within the towns of Whitby and Scarborough, a clue lies in the text:
the solution came to me out of the blue
mountain of information
These clues refer to the Tourist Information Centres, which are marked on OS maps in blue.
These are located at: NZ 898 109 (Whitby) and TA 039 882 (Scarborough).
The position of the 'X' on the casket can then be seen to land at SE 929 971.
This represents the first location in the story that the author travelled to. However, the story indicates that he dug at that location and found nothing. He then saw an image of the moon in a puddle, which gave him another idea for a possible location. This is the clue we need to use to find the actual location of the jewel. The clue is in the reflection of the moon that the author observed. The illustration must therefore be reflected horizontally, as in a mirror, to give a new location for the 'X' on the casket. The new location is at NZ 929 019, which lies on Boggle Hole Road.
The final part of the solution is to solve this riddle, which indicates the precise position of the jewel.
The first line of the riddle is solved by reversing the whole phrase and then extracting even-numbered letters, to give:
ONE STEP BEHIND THEE BESIDE ROAD
The second line indicates that the word 'thee' should be removed, and replaced with 'one from lower starboard'. This refers to the scrap of paper again, which has the word 'trees' at lower right. Taking one of these, i.e. a tree, gives a final message of:
ONE STEP BEHIND TREE BESIDE ROAD
 The Smugglers' Gold jewel was therefore buried one step behind the roadside tree nearest to grid reference NZ 929 019. The actual location was approximately 300 metres to the south-west at:
And it was as simple as that!
Return to the site contents or the list of hunts for the general public.